9.2 Menu
9.2.1 The Menu spreadsheet and Update data from SharePoint

Settings are set up in the Menu sheet, and here the contracts are updated by pressing Update contracts.

(If you need to view previous version of the contract file, you can use Version Control to go back. You can find Version Control in the menu behind the file in SharePoint by clicking on the three dots and then on VERSIONS)

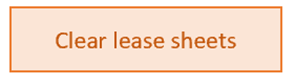
Remove all contracts from the Menu by clicking Clear lease sheet.
9.2.2 Settings
By pressing the Settings button you’ll find a settings menu that has different options.


Warning and error settings
Hide warnings: When you check this box, the Warning tab won’t appear in the calculation spreadsheet. This is useful if you have checked all warnings and have concluded that the leases are registered correctly.
Currency settings
Use closing currency rates only: By checking this box, only closing rates will be used. The closing rate is determined by the currency date, which is the same date as the Period end date specified in Lookup periods. By unchecking this box, the system will automatically calculate data by using average exchange rates. Lookup periods set date ranges to retrieve average rates.
Currency exchange rate source: Here, you can specify the currency source. Two sources are currently available in the dropdown menu: Norges bank and Sveriges Riksbank. If you’re interested in adding your own currency source, please contact us to see if it’s possible to include it.
Use budget currency rates: If you check this box, budget rates will be used for all periods.
Only use budget rates for future currency conversion: If you check this box, budget rates will only be used for future periods.
Show currency conversion in Excel formula: You can either choose to show all currency conversion formulas, or you can show some formulas, or you can hide formulas.
9.2.3 Lookup periods
The important thing to keep in mind (In addition to always pressing Update contracts when you have made changes in SharePoint) is to select the period in the calculation file. The selected period includes the active contracts in that period. If contracts have not yet been started, or if contracts have expired, no data will exist for the selected period.
For period selections (Period Start and Period End), you can look up periods by using the drop-down menu or entering the dates individually.
It’s not necessary to set a start date or an end date. If the start date is not specified, it’s automatically set to January 1st of the same year as the end date:

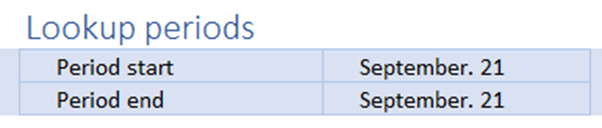
Here is data for the first three quarters of 2021:

Here, data for the third quarter of 2021 is displayed, by selecting July 2021 as the start date:

And here, data is shown for the month of September only:
When the end date field is empty, it will automatically be set to the last date in the same month as the start date:
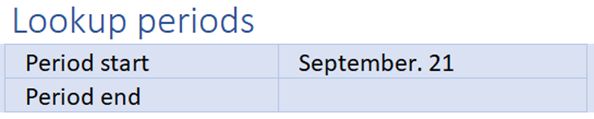
Period Start and Period End affect which numbers are displayed in the result column. It shows the numbers between Period Start and Period End. If both are empty, the search result becomes empty. If only Period Start is empty, you get the sum for the entire period, from January to the Period End (I.e. it should show the “year to date” amount). If only Period End is empty, you get the result for the month set in Period Start (I.e. a one-month period).
9.2.4 Search filters
There are several functions for sorting and filtering. You have Search Filters at the top. These are the criteria used when creating the overview. If these are empty, all the contracts will be displayed.

To set a new filter, you can either tap the drop-down menu in the left column (Column B) and get a list of all available filters, or you can enter the name of the filter.

Since there are many selections in the drop-down menu, you can quickly get a full list of alternatives with explanations and choose the filters you want. Click any cell in the left column (Column B) and then press Ctrl and Space at the same time. This enables you to quickly search the filter by entering key words or letters (AutoComplete) in the pop-up window. Click on the filter you want to use, and the description of the filter will be shown in the window. Then click OK.

Then select from the drop-down menu in the corresponding right-hand column (Column C). Here, filters are selected based on data registered in SharePoint.

When a filter is selected, the overview is updated automatically. To delete a filter, you can clear the values in one of the two columns. This is easiest way to do this is to select a cell and press Delete on the keyboard.
The drop-down menu is currently selected so that it’s also updated, dynamically. This means that if, for example, you have four categories in total among all your contracts, and these are strictly divided between two companies, then only the associated categories will appear in the selection menu, if a company filter has already been selected.
The Title filter is a free text search, rather than a selection. It searches for the names that each contract has been given in SharePoint. The field is read as Regex, which means that you can do quite complicated searches, if desired.
9.2.5 Modify columns in the view
You can also set up the result, by adding several new columns or by choosing to have other data in one column.
You can customize the overview, by either selecting from the drop-down menu found in all cells in the title bar, or you can do it by entering the header in the cell directly. By appending “(metadata)” at the end of the header, you can tell the column to read from a metadata field in the ShareControl app. For example, “Contract Id (metadata)” will display the contract Ids registered in the app instead of the generated one used by the calculation file.

You can also quickly search the result in a separate menu, which appears when a cell in the title bar is selected, by pressing Ctrl + Space. This menu is searchable and includes information on what the result represents. You can quickly search the selections by entering the key word or letters (Auto complete) in the pop-up window. Then click on the title of the result you want, followed by OK.

There are many choices in columns, which allow you to customize the Menu to your preferences.
After a selection is made, the display will update automatically. Only the Title option will result in a link to the worksheet associated with it. To delete a column from the results, you can select the column title and delete the contents by pressing Delete on the keyboard.
As mentioned in the previous section, some of the results depend on what is selected as Period Start and Period End.